FlexHCD sample changer
The FlexHCD is new generation sample changer for macromolecular crystallography beamlines
Offical FlexHCD sample changer manual (PDF)
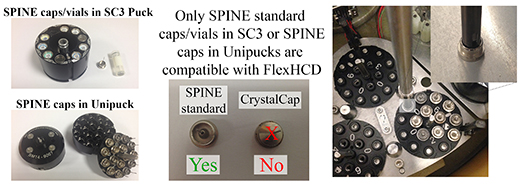
Note - The FlexHCD sample changer is only compatible with SPINE standard pins/vials
1 INTRODUCTION
This manual provide information concerning the operation and use of Flex High Capacity Dewar sample
changer (FlexHCD).
- Please read through the manual before using the machine.
FlexHCD is a versatile, high performance, sample changer system designed to be used in automatized synchrotron beamlines to handle biological crystallized samples at cryogenic temperatures. It allows the users to automatically transfer samples from the High Capacity Dewar to the diffractometer and back. It is based on a 6-axes robotic arm and a high capacity dewar. FlexHCD has been developed by the EMBL Diffraction Instrumentation Group in collaboration with ESRF.
2 Definitions and terminology
· User: People interacting with FlexHCD machine.
· Beamline technician: People in charge of the technical problems occurring on the beamline
· Pin: small, slender, metallic tube or needle with mounted crystal support holding the sample to be exposed to xrays.
· Cap: support/base of the pin.
· Sample holder: Cap + pin.
· Vial: sample holder reservoir and protecting device.
· Puck: Device that stocks several sample holders in order to ease their transport.
· Gripper: Electromechanical device attached to the wrist of the robotic arm intended to pick up/release samples
holder and hold them when the robot is moving.
· Robot controller: Unit holding control electronics and power supply for robotic arm movements.
· Dewar: Liquid nitrogen vessel in which samples are stored
· Tool bank: Mechanical support for the storing of robot grippers
· De-freezing station: Gripper drying device mounted on the tool bank.
· Main rack: Closed cabinet containing electrical & pneumatic devices of the machine.
· Front end rack: Closed cabinet containing electrical & pneumatic devices of the machine installed under the tool
bank
· Touchscreen: Screen of the control computer installed on the marble of the experimental hutch. It’s used to
interact with the FlexHCD during Dewar loading mode and Maintenance mode
· GUI: graphical user interface of the FlexHCD control software
· Goniometer: MD2S goniometer installed in the experimental hutch. The FlexHCD main purpose is to mount and
unmount samples to and from the goniometer.
· X-ray Detector: Detector installed in the experimental hutch permitting to image diffraction patterns resulting
from a data collection.
3 SAFETY
To prevent damage to the equipment or personal injury it is mandatory to read the following safety precautions before use. To prevent possible injury, read all warnings before using this equipment. Any use of the machine not described in this manual is considered as non-compliant.
- It is strictly forbidden to access inside the electrical cabinet or the front end rack during normal machine use. It is strictly forbidden to electrically disconnect any of the elements
- Do not open the experimental hutch doors while mounting or unmounting a sample.
- Do not move the detector while mounting or unmounting a sample.
5 Working modes
Two working modes are available for beamline users:
- Dewar Loading Mode: It must be active to load and unload the High Capacity Dewar with your samples.
- Sample Transfer Mode: Active only with hutch interlocked, allows you to mount and unmount samples on goniometer from MXCube interface.
Loading High Capacity Dewar
To load the High Capacity Dewar (HCD) with your samples, follow the steps described down below.
Wear cryogenic gloves when loading HCD with your samples.
Wear face shield when loading HCD with your samples
Residual risk of nitrogen burns can occur when loading and unloading HCD
Warning against moving part. There is a risk of hitting or crushing when opening and closing HCD User Port.
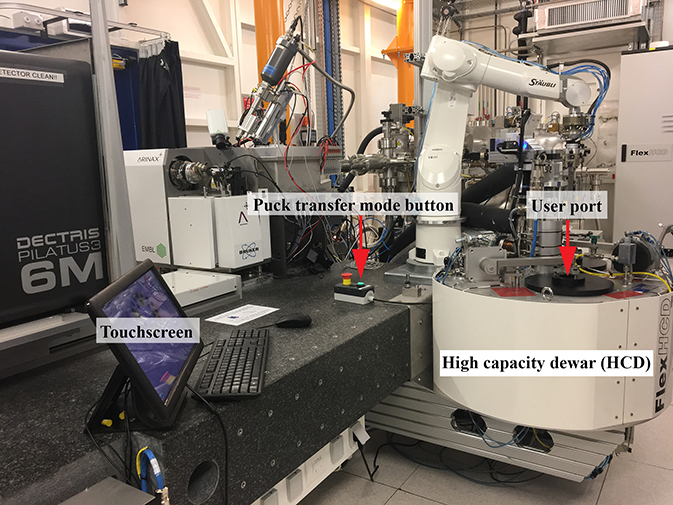
- When you enter the experimental hutch, you must press the green Puck Transfer Mode Button on the pendant near the High Capacity Dewar to put the machine in Dewar Loading Mode. The green button will light up and the touchscreen will be enabled.
- Once Dewar Loading Mode is active, the touchscreen will show the Graphical User Interface (GUI) below.

- When you touch a segment of the plate on the touchscreen the machine will automatically present this plate segment under the HCD User Port marked by the red circle.
- The button placed in the upper right area of the GUI allows you to open and close HCD User Port.
WARNING:
- Do not lean over HCD when opening User Port to avoid hitting.
- Keep your hands away from HCD when closing User Port to avoid finger crushing.Only the person performing the loading or unloading process is authorized in the proximities of the HCD
In the HCD, there are two types of segments: SC3 puck footprint segments and Unipuck footprint segments. On each segment you have three puck slots. The placement of these segments is represented in the following table
| Plate number | Segment Numbers | Segment type |
| 1 | 1, 2, 3 | SC3 |
| 2 | 4, 5, 6 | Unipuck |
| 3 | 7, 8, 9 | SC3 |
| 4 | 10, 11, 12 | Unipuck |
| 5 | 13, 14, 15 | SC3 |
| 6 | 16, 17, 18 | Unipuck |
| 7 | 19, 20, 21 | SC3 |
| 8 | 22, 23, 24 | Unipuck |
The figure below illustrates the SC3 and Unipuck segments. The guiding finger is used to ensure the pucks are correcly oriented in the puck slot
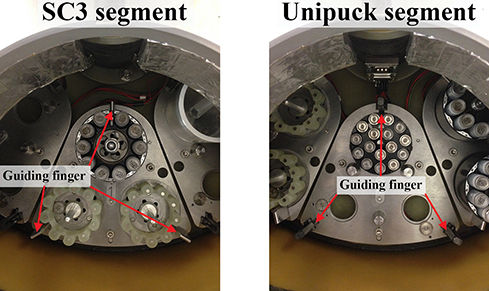
- Every SC3 and Unipuck puck has a guiding groove. During loading this groove must be aligned with the guiding finger on the puck slot inside the HCD to ensure the pucks are correctly positioned (see below)
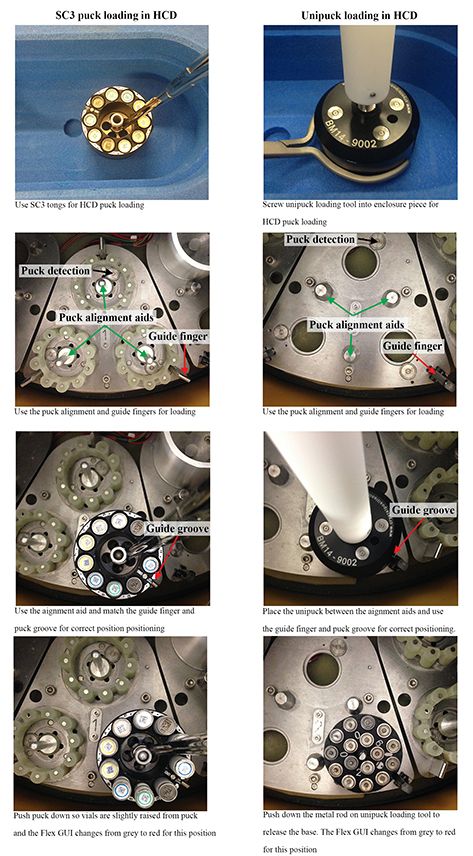
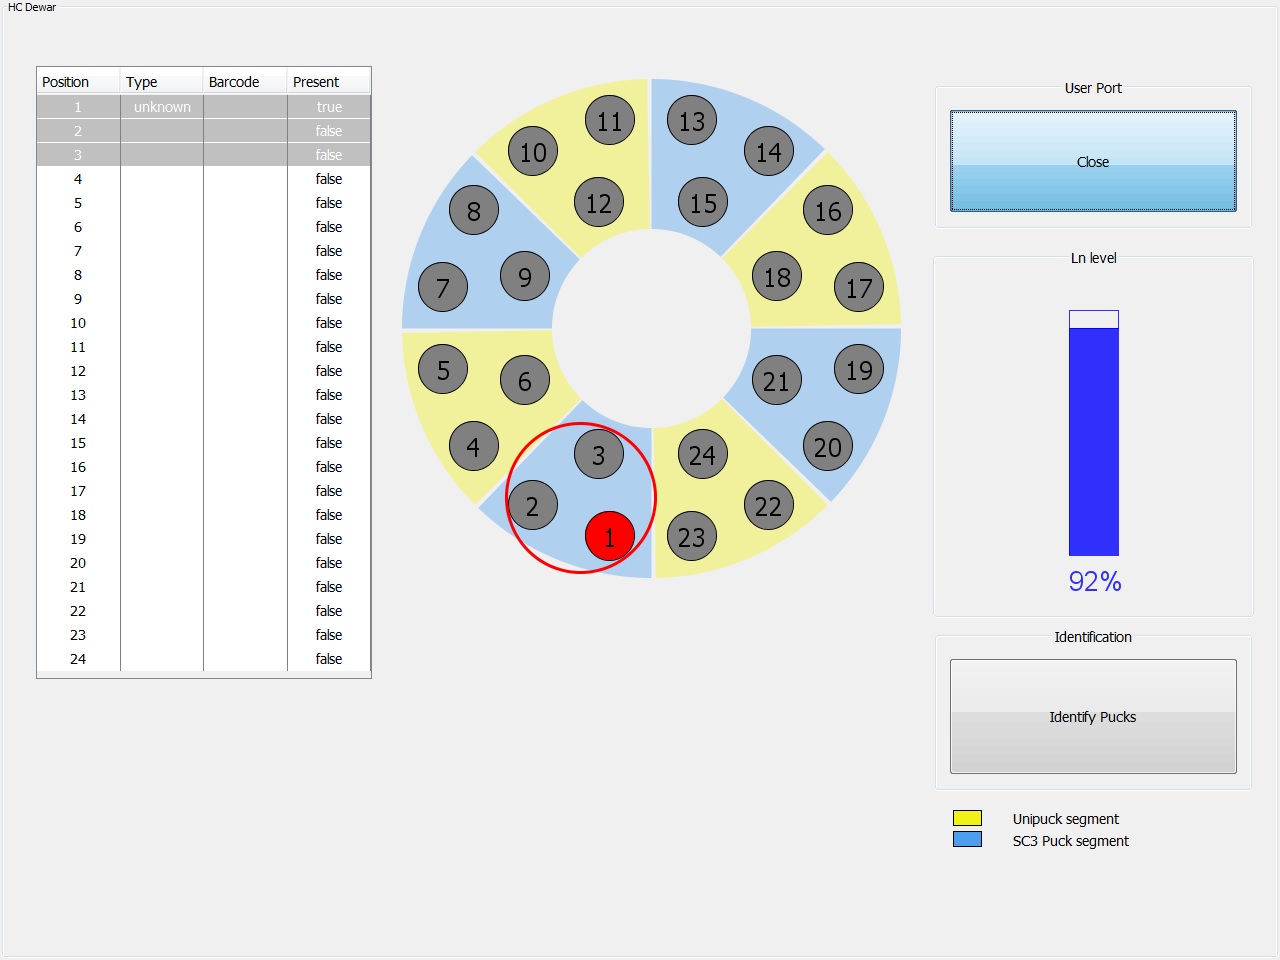
- During the loading process, every time you place a puck correctly in its slot, the FlexHCD will detect its presence. On the GUI, the corresponding HCD slot will change color from grey to red, as shown below. In the GUI a liquid nitrogen level indicator is also shown, as well as a table containing a summary of puck presence and type.
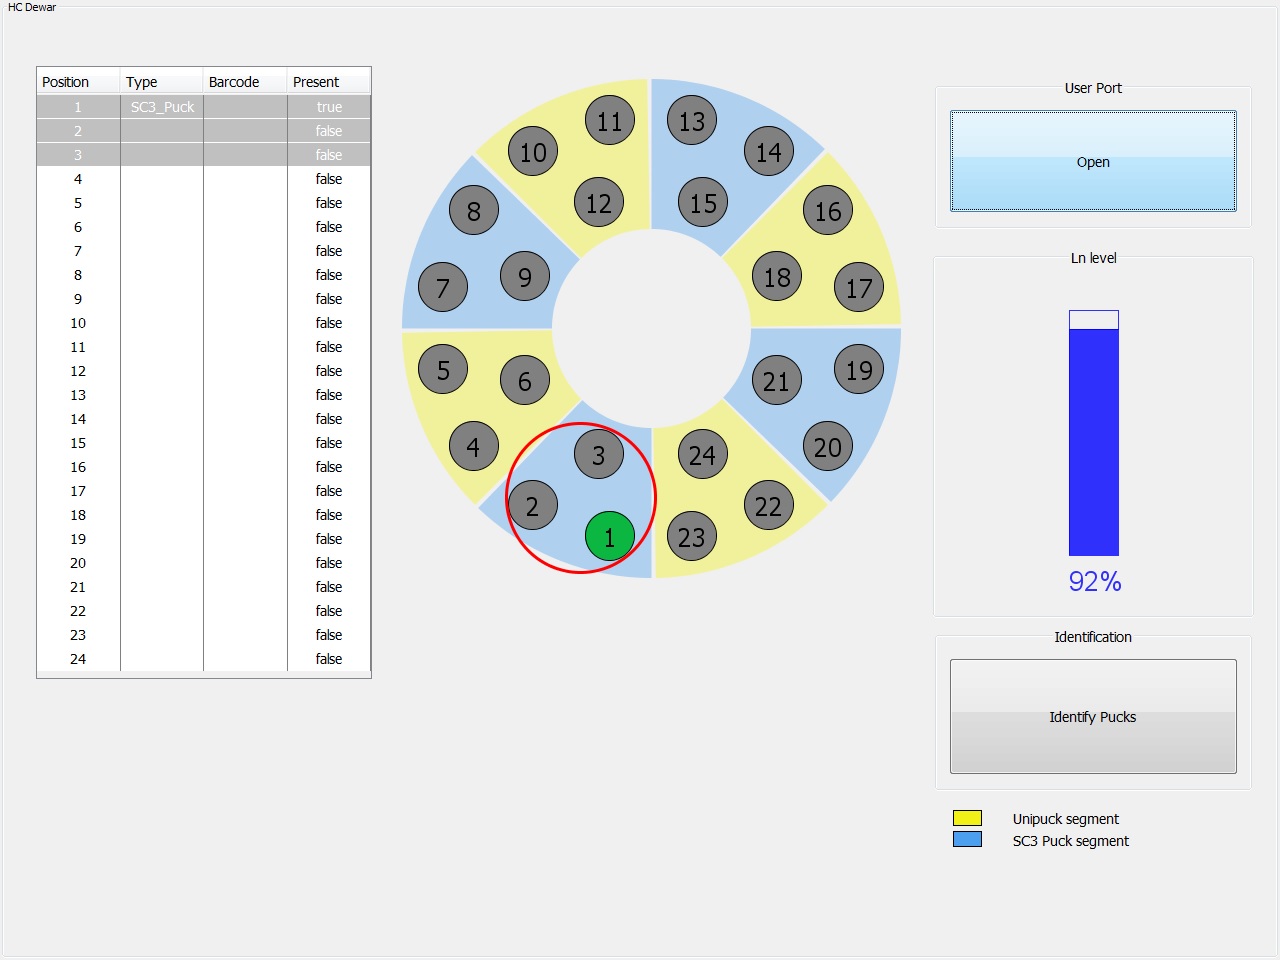
- When loading is complete you should press the 'Identify Pucks' button on the bottom right. The identified pucks will turn green, as shown below
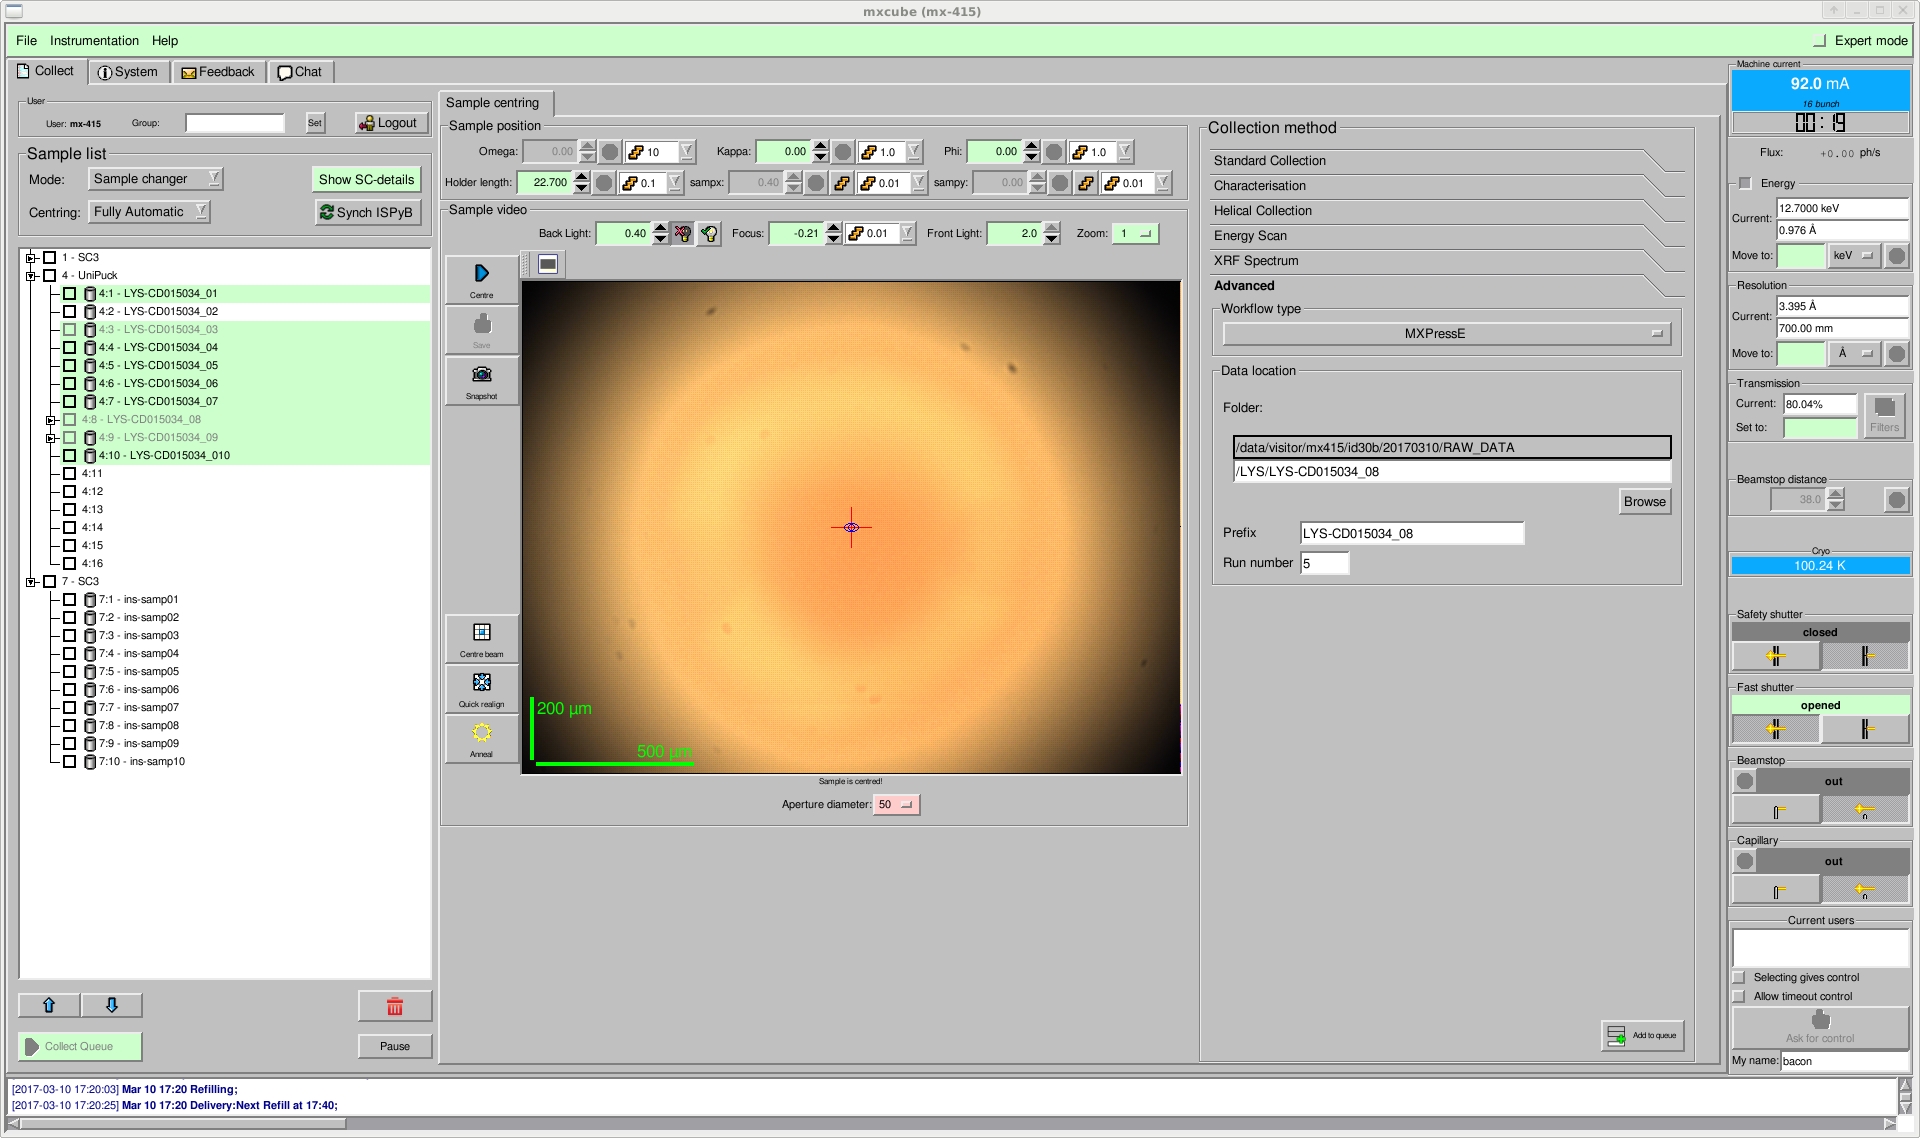
- After interlocking the hutch you should see all your pucks displayed in MxCuBE. The puck position and type (either ''SC3'' or ''UniPuck") are displayed, as shown below.
WARNING
- To avoid collisions, please make sure you load each of your pucks in a compatible segment and that they are correctly placed and detected by the control system.
- Every puck has a groove that must be aligned with the guiding finger on the puck slot inside the HCD to ensure correct placement.
INFORMATION:
- Samples in non-detected pucks (not marked green) will not be mounted by the robot.
- Once you have loaded all your pucks you have to make the system identify these pucks. For that you have to push the button “Identify pucks” on the touchscreen. This action can take several seconds. Once it’s finished, all identified pucks will change color from red to green. Pucks that haven’t been identified will remain red. In this case you have to verify the good positioning of the pucks in their slots. Once you have adjusted their positions, you can relaunch a new “Identify pucks” action.
- When all your pucks are correctly identified you can close the User Port using the corresponding button on the touchscreen, interlock the hutch and proceed to the control cabin to begin data collection.
- The Sample Changer will automatically switch to Sample Transfer Mode when hutch interlock is done.
- Remember that you must not open the hutch, nor move the detector, while mounting or unmounting a sample. Do not enter the hutch when the 'Robot is moving' sign on the control panel is blinking.
INFORMATION:
At any time during HCD loading or unloading, if an emergency situation arrives, you can press the Emergency Stop button (Figure 1) to cut machine power. If this happens, get in touch with local contact to reset the machine.
TROUBLE SHOOTING
Most problems can be overcome using the 'init' command in "sample changer" tab in MxCuBE once the experimental hutch has been interlocked.
If this does not work then interlock the hutch and log onto the FlexHCD computer using VNC on bacon (ID30B control computer). Check the status of the FlexHCD software on the top left. If it reports 'gripper unknown' then restart the FlexHCD software, MxCuBE and redo 'init'.
Forbidden:
- Do not try to do any intervention or manipulate the Sample Changer in a way that is not described in this manual.
- If you find any problem or detect a malfunctioning of the Sample Changer, please get in touch with local contact.
Initializing the robot
When all you pucks are loaded in the HCD and the robot holds the correct gripper, you can proceed to the initialization
of the robot. For that you have to click on the button “Init Robot” (“Commands/Status” tab) in MxCuBE. It will defreeze the gripper
and put the robot in the correct standby position. Once this action is done, the robot is ready for normal operation.
Parking the robot
When you finished working with the FlexHCD it’s recommended to park the robot, in order to clear the space in front of
the goniometer. For that you have to click on the “Park” button (“Commands/Status” tab) in MxCuBE
partners


European Synchrotron Radiation Facility - 71, avenue des Martyrs, CS 40220, 38043 Grenoble Cedex 9, France.