- Home
- News
- Spotlight on Science
- Mapping stress and...
Mapping stress and microstructure in industrial metals
02-10-2024
Scanning 3D X-ray diffraction (s3DXRD) was used at ID11 to map the internal stress and microstructure of aluminium polycrystals under industrially relevant deformation. The findings reveal significant intra-grain stress variations, offering valuable insights for improving models that predict material strength, ductility, and failure, with implications for enhancing industrial metal processing and performance.
Share
The development and processing of metals and alloys are crucial to modern industries such as aerospace, automotive, construction, and energy. The macroscopic properties of metal components – such as strength, ductility, and thermal conductivity – depend heavily on their mechanical response under stress. Metals are polycrystalline materials, consisting of multiple single-crystal grains, each with a unique 3D orientation, morphology, and stress state. This leads to a complex hierarchy of mechanical behaviour, from macroscopic scales to grain ensembles and intra-grain strains and stresses. The distinct elasto-plastic signature of a metal arises from this interplay of microscopic properties.
Historically, industrial processes like rolling, extrusion, and forging have relied on a macroscopic understanding of plastic deformation to engineer desired metal properties. Investigating how microscopic deformation affects performance can significantly benefit industry, helping design new, more durable, and efficient materials. Electron microscopy techniques are widely used to probe metal microstructures but are often limited to thin films or surface layers. For bulk investigations, synchrotron-based techniques such as 3D X-ray diffraction [1] and diffraction contrast tomography [2] are highly effective at producing voxel-based maps of lattice orientation in larger samples. However, at industrially relevant strains (10-90%), mapping the 3D intra-grain stress tensor field remains challenging, limiting the accuracy of predictive models for material failure.
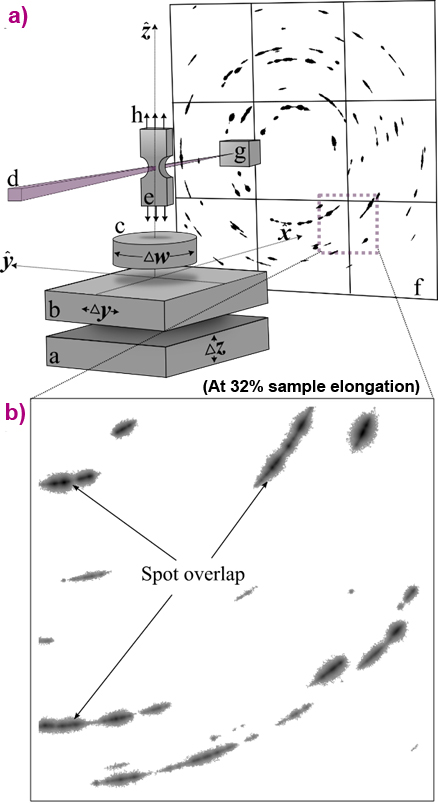
To address this, an advanced scanning 3D X-ray diffraction (s3DXRD) [3] technique was employed to map the microstructure and stress distribution in a highly deformed aluminium alloy. The experiment was conducted at the ID11 beamline using a monochromatic 3 µm × 3 µm micro-beam in raster-scanning mode (Figure 1a). This narrow cross-section of the X-ray beam reduced spot overlap by limiting the diffracting gauge volume. However, at the ultimate tensile strength of the sample (32% elongation), this approach alone was insufficient to eliminate spot overlap (Figure 1b).
Fig. 1: Experimental principle. a) Schematic of the imaging setup at ID11. The sample is raster-scanned using the motors Δy,Δz (a,b) and rotated (c) while being probed with a focused X-ray beam (d). The diffraction signal from the notched sample (e) is acquired by an area detector (f), (g) is a beamstop and (h) illustrates the tensile load pattern. b) Zoom-in on detector diffraction peaks. Plastic deformations caused peak arcing around the diffraction rings and diffraction spot overlap. The image was modified with permission from the original publication.
To overcome this issue, a novel reconstruction algorithm was developed. It utilizes spatial correlation features in the intra-grain orientation field to constrain the regression problem and reconstruct the local strain-orientation states. This enabled mapping of the internal stress and crystal orientation in a volume of approximately 440 × 440 × 9 μm3, corresponding to 250,000 individual voxels.
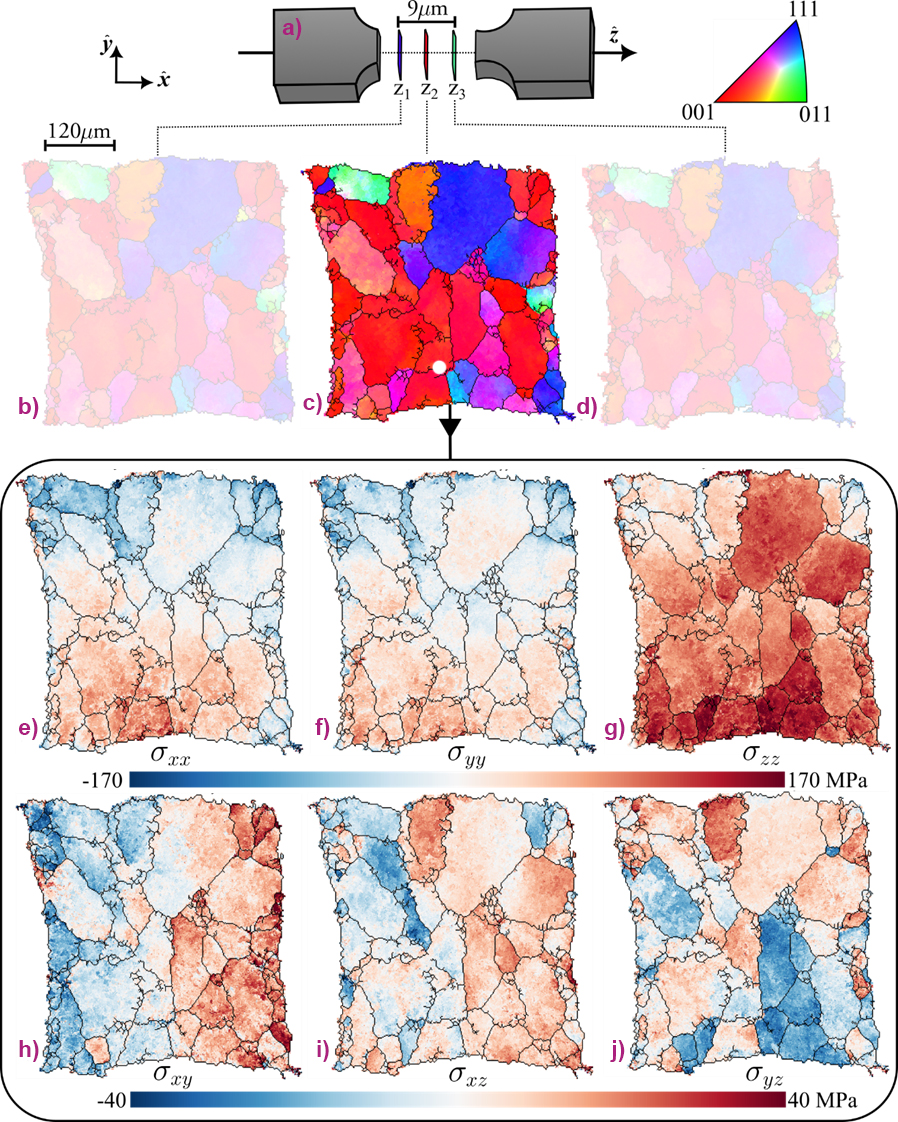
As illustrated in Figure 2, significant intra-grain stress variations were observed (Figure 2e-i), with intra-grain misorientations exceeding 10 degrees (Figure 2b-d). Intra-grain stress variations up to half of the inter-grain variations were detected (36 and 76 MPa respectively), dominated by grain orientation effects. Several local intra-grain stress concentrations, which are potential sites for damage nucleation, were also observed. Characterizing these concentrations is essential for refining models of structure-property relationships and predicting material failure.
Fig. 2: Reconstructed microstructure. a) Schematic of the aluminium sample highlighting three scanned slices (z1-3) located at the sample notch centre. b-d) Orientation maps. The colour map (top right triangle) indicates the inverse pole figure (IPF), showing which crystallographic plane normal aligns with the tensile loading axis (z ̂). Grain boundaries are marked with black lines and are defined by a local misorientation greater than 4o. e-j) Stress tensor map for the central layer, corresponding to the orientation map in (c). e-g) Axial stress components σxx, σyy, and σzz, respectively. h-j) Shear stress components σxy, σxz, and σyz, respectively. The image was modified with permission from the original publication.
By leveraging spatial correlations within the orientation field, the algorithm effectively narrows down the set of possible solutions to the inverse problem. A single stress-orientation field is generated, while maintaining data fidelity from a multi-channel grain map. A procedure for evaluating spatial accuracy, based on grain boundary positions, revealed a standard deviation smaller than the beam size. The standard deviations of the six residual stress components for each voxel were in the range of 8-12 MPa, a noise level sufficient for testing most modelling approaches.
Looking ahead, the experimental setup supports simultaneous absorption contrast tomography, providing a direct link between microstructural stress-orientation evolution and the formation of voids and cracks. The scale-invariant reconstruction approach can be applied to study polycrystals with nanometre-sized grains, using state-of-the-art setups at ID11 with nano-beams as small as 100-250 nm. From a broader perspective, X-ray diffraction microscopy is expected to address critical questions in metallurgy by characterizing industrially relevant plastic deformation in 3D and in situ. Ultimately, these capabilities will bridge the gap between nanoscale and macroscale mechanics, paving the way for the next generation of predictive materials models.
Principal publication and authors
Microstructure and stress mapping in 3D at industrially relevant degrees of plastic deformation, A. Henningsson (a), M. Kutsal (b,c), J.P. Wright (c), W. Ludwig (c,d), H.O. Sørensen (e), S.A. Hall (a), G. Winther (f), H.F. Poulsen (b), Sci. Rep. 14, 20213 (2024); https://doi.org/10.1038/s41598-024-71006-0
(a) Division of Solid Mechanics, Lund University, Lund (Sweden)
(b) Department of Physics, Technical University of Denmark, Kongens Lyngby (Denmark)
(c) ESRF
(d) MATEIS, Universite de Lyon, INSA Lyon, CNRS UMR5510, Villeurbanne (France)
(e) Xnovo Technology ApS, Køge (Denmark)
(f) Department of Civil and Mechanical Engineering, Technical University of Denmark, Kongens Lyngby (Denmark)
References
[1] H.F. Poulsen et al., J. Appl. Crystallogr. 34, 751-756 (2001).
[2] A. King et al., Science 321, 382-385 (2008).
[3] A. Bonnin et al., Appl. Phys. Lett. 105, 084103 (2014).
| About the beamline: ID11 |
|
The Materials Science beamline, ID11, is dedicated to high-energy X-ray diffraction (XRD) and imaging studies. The beamline was upgraded with the addition of a nano-resolution station located 100 m from the source, enabling diffraction measurements with very high spatial resolution (<100 nm). ID11 offers a comprehensive suite of X-ray diffraction techniques, including 3DXRD, diffraction contrast tomography, diffuse X-ray scattering, imaging, pair-distribution function analysis, and powder diffraction. The beamline supports the analysis of a wide range of samples, from amorphous and powder materials to poly-crystals and single crystals with sample size ranging from nano- to micro- to larger-scale specimens. Users also have access to a variety of sample environments. |


