- Home
- Users & Science
- Find a beamline
- ID19 - Microtomography beamline
- ID19 Beamline description
- General description
- Beamline generalities and tips
Beamline generalities and tips
Contents:
- insertion device,
- shutters,
- vacuum,
- thermocouples,
- attenuators,
- slits ,
- monochromators,
- helium,
- chopper,
- compressed air,
- monitors,
- switching between monochromatic and white beam,
- no beam at the sample.
how to open a window on an UNIX machine?
a) click on the arrow above small computer icon on the bottom of the screen and click on ‘Local Xterm’ option.
or b) click on the arrow above small notebook icon on the bottom of the screen and click on ‘Terminal’ option.
how to open SPEC or beamline applications? (List of all SPEC sessions at ID19)
a) in any free space on the screen click first button of the mouse, choice application from viewed menu and click on (ex. ‘vacuum’).
or b) open a window and write the name of desired application (ex. ‘hdiffr’).
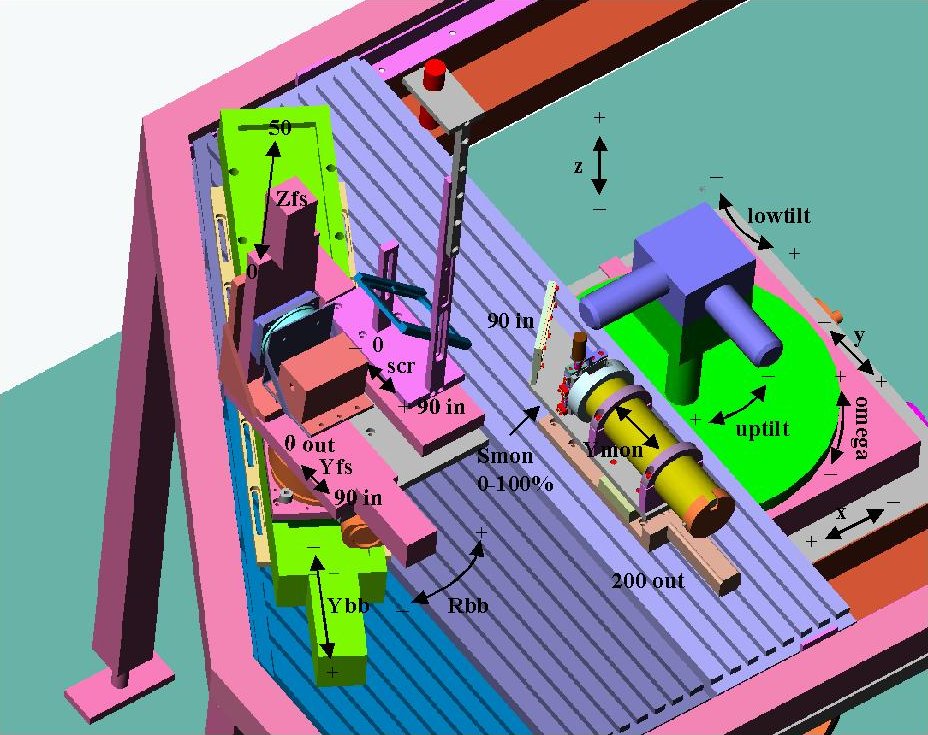
Beamline consists in Optic hutch, Tunnel, Monochromator and Experimental hutches.
Link to general scheme
(on ganymedes computer)
| Wiggler |
| Undulator U32 |
| Undulator U44 |
See this page for more details about insertion devices at ID19
(on ganymedes computer) stop the photon beam if closed.
- Front-End = it is the first shutter of the beamline, however located inside the ring. It can be open or close by ‘idappli’ application (turning on small monitor near the printer). Front-End should be closed if you wish to enter into the Optic hutch. The machine operator can open/close it also, this is used in Automatic Mode option, when after machine refilling, the Front-End is automatically re-open. Note that the Automatic Mode stops, i.e. the Front-End is closed, after 16 hours automatically.
- Safety Shutter 1 = it is the second beamline shutter, located at the end of the Optic hutch, just before the tunnel (note that there is not any light on when it is open, as for Front-End and Variable Beam Shutter is). Its state can be read or modified when using either graphical general beam line application called ‘vacuum’ or the application called ‘shutters’.
- Variable Beam Shutter = it is the third shutter of the beamline, located at the end of the Monochromator hutch, just before the Experimental Hutch. This shutter should be closed if you wish to enter Experimental hutch. Its state can be read or modified when using the applications called ‘vacuum’ or ‘shutters’, or by taping commands shopen, shclose in any SPEC session.
Note that you can open these shutters only if corresponding PSS checking is made.
- Experimental shutters are small removable shutters, located in ‘blue box’ of the Experimental hutch. They are used to define precisely the exposure time (no relation with PSS). White Beam: a massive copper block moved by compressed air is used. Monochromatic Beam: small BFI OPTILAS shutter (either 40*14mm2 or 8*8mm2 - Please connect corresponding power supply and verify connected BNC cable!).
(on ganymedes computer) click for enlarged image

- Up to the Beryllium window situated at the beginning of the Monochromator hutch, there is no separation from the vacuum of the machine storage ring. Consequently, vacuum values should not exceed 10-8 mbar. You find them in ‘vacuum’ application.
- Several valves situated along the beamline allow the vacuum separation of various part of the beamline, they should be all open, when the photon beam expected. Their state, as well as the tool to open/close them, can be found in ‘vacuum’ application with the exception of the Front-End Ultra High Vacuum (UHV) and the manual valve.
Front-End UHV valve is situated inside the ring. If it is closed, the Front-End does not open. Its state can be seen in ‘FE status’ option of the ‘idappli’ application (ex. M2 Valve: (UHV) Gate valve in Fron-End Module 2 is closed). Only the machine operator can open it (To call him: 24 90)
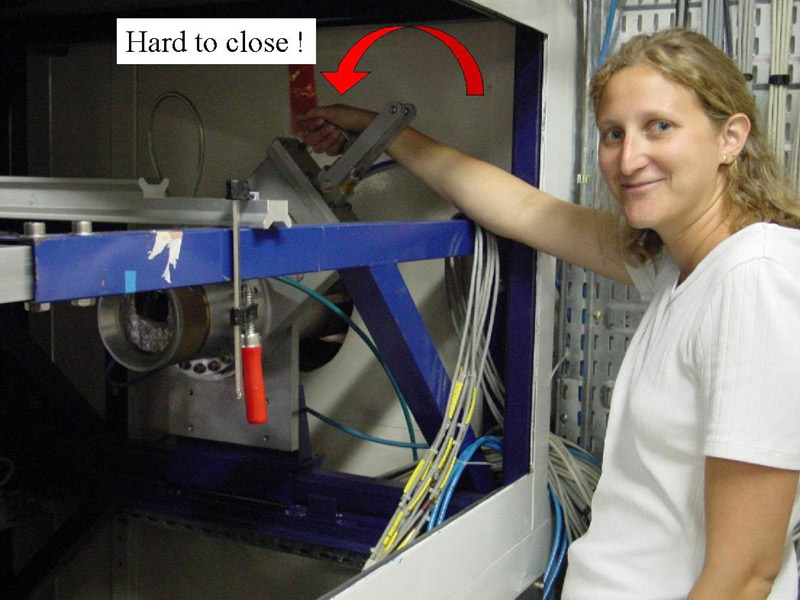
Manual valve (mechanical valve 0) is mounted at the end of the tube in the Experimental hutch inside the blue box (Used to isolate He atmosphere if needed. See for example No more He in Mono Hutch What to do ?).
(on ganymedes computer) Check heating of optical elements (important mainly for primary slits and monochromator). Their values can be found in graphical application called
‘Signal Monitoring’
.
Any temperature should not exceed 50°C.
(on ganymedes computer) Absorbers are located in the Optic hutch.
- consist in two attenuators nº1 and nº2. Each attenuator has 3 axis. Each axis has 4 positions (3 are filled with various absorbers and the fourth is free, i.e. ‘no filter’ position)
- first axis of attenuator nº1, called ‘diam’, is special: it consists in two diamond windows/absorbers (one small and one large); one of them should ALWAYS BE IN the beam, other two positions of this attenuator axis are so forbidden. The diamond windows are necessery in order to protect the beryllium window located at the end of the tunnel from low energy radiation.
The smaller (5 mm diameter ring) diamond is used with undulator radiation. It resists better to the heat load, however maximal horizontal beam size in the
Experimental hutch
expected is only about 25 mm.
Second diamond, bigger one, should be used with wiggler and allow to obtain the maximal size of the beam (up to 50 mm horizontally).
Note that the undulator window can be used also with wiggler, however the wiggler window should be NEVER in the beam with undulator !!!! (Undulator radiation is more concentrated, ie smaller beam size with higher flux, than wiggler spectrum. This will lead to a temperature gradient which can break the bigger diamond!).
- the modification of the attenuators can be done using SPEC session 'natt'. A semi-graphical window is open when taping attshow, then the actual attenuator setting can be seen and modified by taping the corresponding attenuator number. For example, 202, corresponding to the 2nd axis of the attenuator nº1, puts the 0.25 mm Al filter in the beam. Outside the attshow menu, the position of any absorber can be adjusted using usual SPEC commands, for example mvr at12 0.01, which will move the 2nd axis of the attenuator nº1 by 0.01 (1 corresponds to the vertical distance between two attenuators, being 30 mm).
- make sure if using a "heavy" absorber (as Cu or W), that upstream there is at least 0.5 mm Al filter in the beam (the bigger first number in absorber name, the further it is from the source).
(on ganymedes computer) Define X-ray beam size.
- primary slits (PS) situated in the Optic hutch (modified by graphical application ‘primary slits’ or SPEC session 'sslits').
- secondary slits (SS) situated in the Monochromator hutch just before monochromator, recommended opening: sec_slits=5×prim_slits (modified by graphical application ‘secondary slits’ or SPEC session 'sslits').
- accurate slits (AS) situated in the Experimental hutch between the blue box and horizontal diffractometer (modified by graphical application ‘accurate slits’ or SPEC session 'sslits'). They can be completely moved in or out of the beam (to avoid defects on kapton windows: phase contrast...) using compressed air (small FESTO manual valve).
- manual slits on the exit wall of the blue box (modified by hands, left or/and right, top or/and bottom).
(on xtopo2 computer, 'vmono' SPEC session)
| SPEC session | Monochromator type |
|
vmono (vertical monochromator) Monochromator Hutch |
Fixed exit, two Si(111) crystals. Energy available between 7 and 60 keV. |
|
hmono (horizontal monochromator) blue box - Experimental Hutch |
Single crystal (Si, Ge, ...) |
|
hmono (vertical monochromator) blue box - Experimental Hutch |
multilayer 100mm long multilayer 300mm long Energy available between 7 and 40 keV. |
atmosphere protecting beryllium window and monochromator crystals.
- from the beryllium window at the beginning of the Monochromator hutch up to carbon window in the Experimental hutch beamline should be under helium. If not, no photon beam permitted.
- check regularly helium level on the 'chopper' monitor screen: small black ball should be situated between the marked limits.
If needed, see ' No more He in Mono Hutch What to do ? '.
(on xtopo2 computer) Used mainly to decrease the photon flux in white beam mode.
- big double wheel situated at the beginning of the Monochromatic hutch.
- state can be seen on the monitor screen (together with helium checking ball).
How to start it:
1) turn to the left the black lever on the small metallic box situated on the right at the upper shelf in the Control room
blue light should turn on.
2) in SPEC session 'hdiffr': rchop 2, chopper starts to turn.
3) in SPEC session 'hdiffr': mv chop 20, close the chopper wheels in the way that only 20% of incident photons are transmitted (100% corresponds to the stopped chopper).
How to stop it:
1) in SPEC session 'hdiffr': mv chop 50, i.e. maximal opening of the chopper.
2) in SPEC session 'hdiffr': rchop 0, the chopper turns very slowly.
3) at the appropriate moment (= the moment whent the beam path is not closed), looking on the monitor, choose the moment when the empty space of the chopper is between two marked lines stop it by turning to the right the black lever on the small metallic box, blue light should turn off.
NEVER do item 3) before 2) !!!
(on europa computer and manual box)
(on europa computer for xgestion SPEC session)
| Monochromatic Beam (MB) | White Beam (WB) | |
|
Carbon windows Aluminium plate (blue box) |
top free | bottom free |
| hmono | free (no multilayer, no laser,...) | free (no multilayer, no laser,...) |
|
Experimental shutter (blue box) |
- big copper block moved out of the beam (manually translated)
- small shutter |
- big copper block moved to the beam position (manually translated) - compressed air put on - shutter controller = black box in Control room switch on
- small shutter removed |
|
Manual slits (exit of the blue box) |
modify opening of the slits (top position) |
modify opening of the slits (bottom position) |
| Beam stop | not needed | NEEDED |
|
Monochromator setup SPEC session 'vmono' |
- To know actual energy setting:
getE - To move at a given energy E: moveE E + 2 automatic scans First scan with r1 Second fine scan with pz1 (piezo) Values for pz1 are between 0 and 4 volts (usual value around 2 volts). |
To remove monochromator: moveE 0 |
NO BEAM AT THE SAMPLE: what can be the reasons...
| Synchrotron problem |
Check state of the machine current: it should be different from zero! (see ganymedes computer) |
| Shutters |
Quick first check: verify that 4 luminous panels have light on in control room, near experimental hutch door. Control opening of all shutters (Front-End, Safety Shutter, Variable Beam Shutter, Experimental Shutter). Note that they can be open only if appropriate PSS check of corresponding hutches or tunnel were done. |
| Heating security |
In Front End manual mode, all insertion device gaps are open to 295mm after 16 hours. Check that one gap is closed to a working value (ie |
| Valves |
i) in ‘vacuum’ application, they should be in green. ii) state of Front-End valve (‘idappli’ application option ‘Front-End state’). iii) manual valve mounted at the end of the tube in the Experimental hutch inside blue box. |
| Attenuators | check state of all absorbers (in SPEC session 'natt') and move them if necessary. |
| Slits | control opening and offset of all slits: primary, secondary, accurate (in the corresponding SPEC sessions) and the manual slits (exit of blue box). |
|
Carbon windows Aluminium plate |
check the Aluminium plate at the end of the beam tube in blue box: top free for MB and bottom free for WB. |
| Monitor/Screen |
- Make a ct in any SPEC session to see if monitor detects diffused beam in blue box. |
partners


European Synchrotron Radiation Facility - 71, avenue des Martyrs, CS 40220, 38043 Grenoble Cedex 9, France.