- Home
- Users & Science
- User Guide
- Before your experiment
- Shipping Samples (MX and non-MX samples)
- Non-Structural Biology Samples: how to prepare a shipment to be sent to ESRF
Non-Structural Biology Samples: how to prepare a shipment to be sent to ESRF
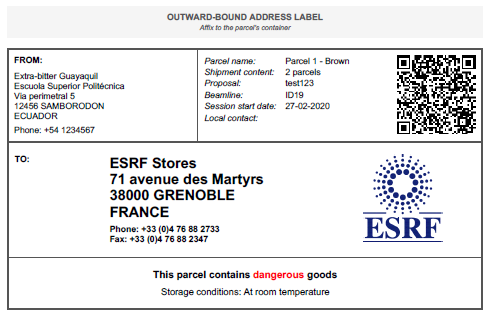
The ESRF Data Portal (ICAT@ESRF) also serves the purpose of tracking all samples and equipment sent to the ESRF for user experiments. The ESRF is obliged to know at all times what samples and equipment are onsite, where they are at any particular time, and when they have left the site. Before sending any samples or ancillary equipment to the ESRF, users must declare those elements in a shipment corresponding to their experiment session in the Data Portal and print the ESRF label(s) generated by the Data Portal to affix to the parcel(s) to be sent. These ESRF labels enable the tracking of each parcel by both the user and the ESRF from the time it arrives at the ESRF until it departs. They are used in addition to the forwarder labels (shipping label from courier company) applied when sending the parcel to the ESRF.

Prerequisites :
All sample sheets must first be created and completed in the User Portal, and validated by the Safety group before they can be added to a parcel in the Data Portal.
A shipment is a set of parcels to be sent for a particular experiment session. The parcels in the shipment can be sent from the same or different addresses. The creation of a shipment and ESRF labels for each parcel is done within the Data Portal:
- Log-in to the ESRF Data Portal (https://data.esrf.fr) by clicking on the « Sign in with ESRF SSO » button. This will use your personal ESRF credentials to log you in. If you cannot login this way, you need to first go the ESRF User Portal to create your ESRF Username.
- Details instructions can be found by clicking the Help button in the top banner of the Data Portal:

Note: ICAT gets updated information regularly from the User Portal (i.e. new experiment sessions, new sample sheets). If you don’t see your session but have received an invitation, please wait for about 15 min and refresh the page.
- Print the TO and FROM ESRF labels:
On the parcel details page, click on the « Download Labels » button that is now accessible on the top right hand side of the page.
Note: The QR code that appears on these labels is used for tracking your parcel when it arrives at the ESRF Stores and at the beamline, until it is sent back to you or destroyed.
- Affix the "TO ESRF" label to the parcel.
- Put the Return label inside the parcel so that it can be used for returning your parcel to you.

Please note that any parcel without an ESRF label will not be accepted by the ESRF stores.
IMPORTANT : Make sure to also request a return label from your forwarder for it's seamless return to you after your experiment.
1. Organise the transport of your parcel with your forwarder and transport adviser to make sure all the paperwork necessary for the shipment is completed and affixed to the parcel.
Specify the number of parcels included in the shipment and their individual weight & dimensions, the shipment purpose is "Samples" or "Scientific samples" in the case of samples, declare a custom value of €10 (your laboratory insurance should cover the transport of your goods), request a return label for a seamless return of your parcels after your experiment.
If you are using the FedEx Company:
- Specify the "number of packages" included in the shipment (i.e. 3 x packages/dewars present in one shipment )
- Specify the weight per package (i.e 18 kg for a dewar)
- Choose "International Priority" as the service type (to reduce the clearance delay in France) for non-EU originating shipments
- Specify the package type = Your packaging
- Specify the dimensions of the package (i.e. 'BIG 40x40x60' for a dewar)
- Package contents = Products/Commodities/Items
- Shipment purpose = Sample (or "Scientific samples")
- Declare a total customs value of €10 (your laboratory insurance should cover the transport of your goods).
- Tick "Include a return label"
- Specify the account reference = session reference code generated and displayed in your ISPyB shipment page (for MX academic users only)
2. Prepare the parcel
- Affix the forwarder paperwork on the parcel without covering the ESRF label
- Add the forwarder return paperwork inside the parcel together with the ESRF return label
- Send the parcel with your forwarder
3. Change its status in the Data Portal (ICAT) by clicking on the « MARK as SENT» button at the top of the parcel page. Once this is done, you will be asked to certify the parcel content and declare if the parcel contains dangerous goods.
- Email notifications will be sent to the Users on the A-form for each modification of the parcel status.
- An overview of the parcel status history is available in ICAT in the « History » section at the bottom of your parcel's detail page.
If you have any difficulties with preparing your shipment in ICAT or need help locating your parcels, please contact your ESRF local contact for that experiment session (you can find him/her on your A form for that session in the User Portal).
- Financial support for sample transport
The ESRF will cover either the travel expenses for an eligible user to visit the ESRF or the cost of shipping a parcel of samples to and from the ESRF, within the limits of the maximum number of users or parcels allowed for the specific experiment type. For most experiments, this means the ESRF will pay the shipping costs for up to 3 parcels (4 for LTPs and 2 for Cryo-EM experiments).
The parcels do not necessarily have to be sent from the laboratories of the users on the A-form.
Please note that this financial support is strictly limited to the transport of samples to/from ESRF member countries and does not cover the transport of any other goods such as equipment or chemicals, even if directly related to the experiment. Moreover the ESRF will not reimburse any additional costs related to transport insurance or customs clearance for the shipment of the parcels; these costs must be covered by the user or the user institute.
Additionally, the reimbursement for sample transport is subject to the same conditions as for user travel in that the users are expected to comply with good management of public funds (i.e. costs that are reasonable and cost effective). The ESRF reimbursement will be based on the most economical solution and, in all cases, will not exceed the cost equivalent of user travel from the same country to the ESRF.
- To request reimbursement, one of the members of the user team must submit a reimbursement claim (Excel file downloadable here), indicating clearly the number of parcels for which reimbursement is requested, the individual cost for each parcel, and the total cost for the shipment of the parcels. Please send your reimbursement claim to useroff@esrf.fr. Detailed information on reimbursement claims can be found here (section 8. Reimbursement procedure).
Please indicate clearly the number of parcels for which reimbursement is requested, the individual cost for each parcel, and the total cost for the shipment of the parcels. Detailed information on reimbursement claims can be found here (section 8. Reimbursement procedure).
- The ESRF cannot reimburse an institute, only a user. The ESRF will reimburse the user who has submitted the reimbursement claim. All reimbursed users should arrange directly with their institute for reimbursement of costs if they have been paid by the institute. To discuss possible alternative arrangements, please contact useroff@esrf.fr.
partners


European Synchrotron Radiation Facility - 71, avenue des Martyrs, CS 40220, 38043 Grenoble Cedex 9, France.