![]()
![]()
![]()

|
|
|
|
|
TANGO
|
Revision: - Author:
This class is a Tango interface to the Nintendo Wiimote game controller. The Wiimote is the Nintendo Wii game system controller. You associate Tango object with Wiimote button/accelerators and then, you can control them using the Wiimote
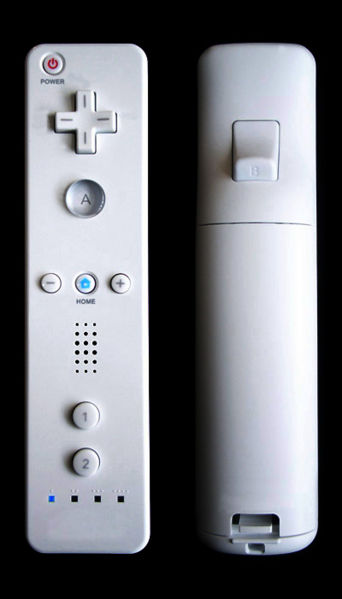
The Wiimote game controller communicates with a computer using bluetooth. It has been developped and tested using a USB bluetooth dongle from Conceptronic model CBT200U2. The Wiimote controller has:
Eleven buttons: 10 on the front side and one on the back side.
Three accelerometers (One for each axis)
Four leds
A speaker
An Infra Red sensor (not interfaced)
Some internal EEPROM memory (not interfaced)
The following image is a picture of the Wiimote controller
The Tango class has been developed and tested using Linux (Suse 10.2) with bluez as bluetooth communication stack. Bluez is part of the Linux kernel since release 2.4. The communication between the Tango class and the Wiimote device (via Bluetooth) is done using the cwiid library (LGPL license). This is an event driven API which interfaces most of the Wiimote hardware equipment. You have to compile and install this library first. This Tango class has been developped and tested using release 0.5.02.
To use this device, you first has to associate a Tango object to the Wiimote button you plan to use. A Tango object can be:
A device command (only VOID as input and output data type are allowed)
A device attribute (SCALAR, numerical data type, WRITE or READ_WRITE)
The Tango device has two attributes for each button. One attribute (String, Scalar, READ_WRITE) allows the user to define the Tango object associated to the button. The syntax is the always device_name/Attr_name or device_name/Cmd_name (Ex: sr/ps-d/01/Value or sr/ps-d/01/On). An empty string will break the association. The second attribute is used only if the button is associated to an attribute. This attribute (Double, Scalar, READ_WRITE, Expert mode) defines the delta (positive or negative) applied on the attribute when the button is pushed.
When a Tango device attribute is associated to a button, the algorithm used by the Wiimote Tango device to modify the attribute when a button is pushed is: Read the attribute, change its value by adding the delta and write the attribute. When it is a command which is associated to the button, the algorithm simply execute the command. If the algorithm failed, the Wiimote speaker is activated during a time defined by a property (ErrorBipTime)
The Tango Wiimote device has two modes of operation:
The single shot mode (which is the default one)
The continuous mode
In single shot mode, the action on the associated button is executed once each time the button is pressed. In continuous mode, the action is executed continuously by a thread. Before executing action, the thread waits first for the end of the previous one which is detected by the attribute quality factor moving from CHANGING to VALID. Then, it wait for a sleep time defined by the property called ContModeSleepTime. The thread aborts as soon as an error is detected. To enter the continuous mode, you have to pressed simultaneously the B button (the one on the back of the Wiimote) and any other button. Obviously, the B button must not be associated to any Tango object. To inform the user that the Wiimote Tango device is in continuous mode, the four Wiimote leds flashes one after the other.
A minimum interface has been written for the three accelerometers. The axis definition is the following
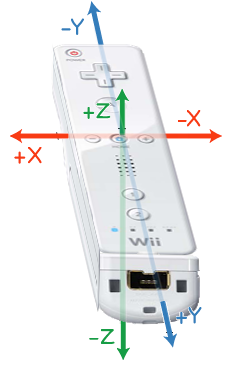
Six
pseudo buttons have been created to deal with these accelerometers.
These pseudo buttons are used to interface:
An acceleration on the X axis in the positive direction
An acceleration on the X axis in the negative direction
An acceleration on the Y axis in the positive direction
An acceleration on the Y axis in the negative direction
An acceleration on the Z axis in the positive direction
An acceleration on the Z axis in the negative direction
A threshold defined by the property named accThreshold is used to fire the action on the associated Tango object.
It is physically difficult to apply to the Wiimote an acceleration in only one axis. This can generate problems if, for instance, you associate an action on the X axis and on the Z axis. Moving the Wiimote will sometimes generate action on both axis. Therefore, it is not possible to associate a Tango object on one axis (+ or -) if another axis is already associated to a Tango object.
Before using the Wiimote Tango device, you first have to test the Bluetooth conection. Connect your Bluetooth dongle in one of the USB port of your computer. With the lsusb command, you can check that the USB bluetooth device is detected. Here is an example of the lsusb command output on the computer used to develop this Tango class:
Bus 002 Device 008: ID 0a12:0001 Cambridge Silicon Radio, Ltd Bluetooth Dongle (HCI mode)
Then, you have to activate the Bluetooth services (process called hcid ). Usually, this is something you can do with your computer control center (yast2/hardware for instance for Suse distribution). Finally, you have to find the address of your Wiimote. Type the command hidd --search and press simultaneously Wiimote buttons 1 and 2. The Wiimote bluetooth address will be displayed on the screen. Only the last three digits are significant. The first three is the manufacturer identifier. Initialize the device property called BluetoothAddress with these last three digits (syntax aa:bb:cc). You are now ready to start the device server
Each time you disconnect from the Wiimote (killing the device server or using the Disconnect command), the Wiimote library print an error message on the screen. This is a small bug that you can fix by replacing the following lines
if ((res = pthread_cond_destroy(&queue->cond)) != 0)
{
ret = -1;
}
with
while(pthread_cond_destroy(&queue->cond) ==
EBUSY)
{
pthread_cond_broadcast(&queue->cond);
}
in the queue_free() function defined in the library wiimote/queue.c file.
Happy Wiimoting !!