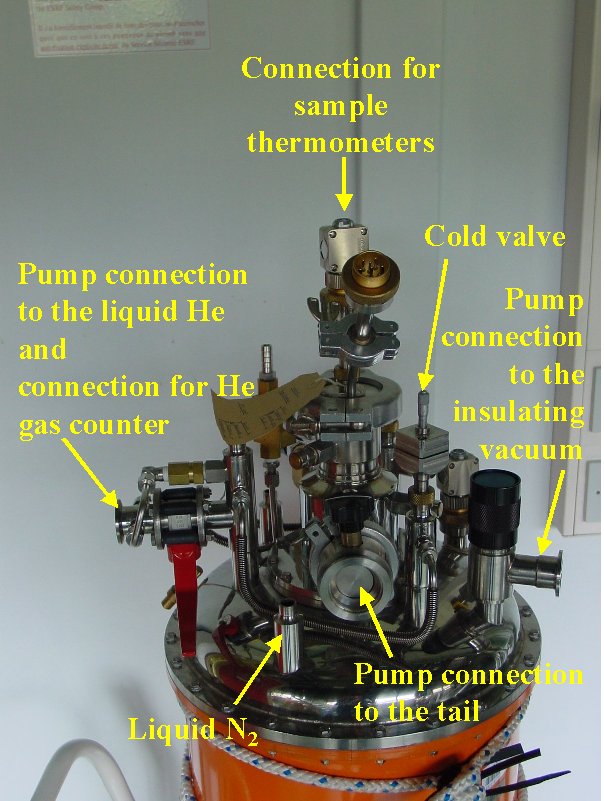
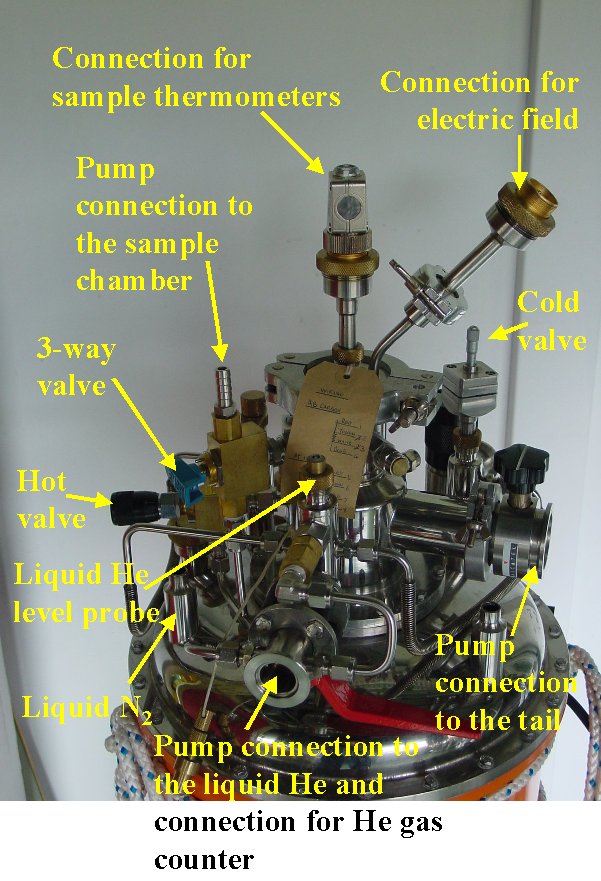
Orange Cryostat
 |
 |
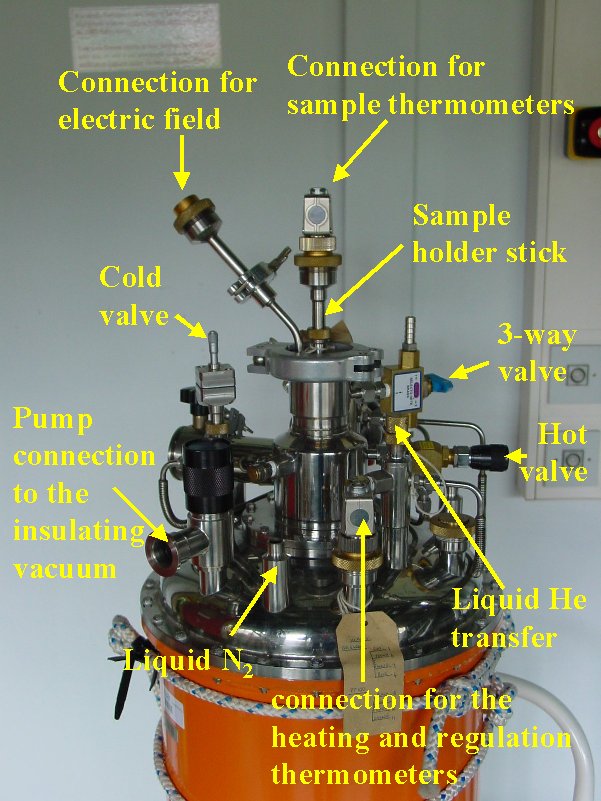 |
| Figure 1 | Figure 2 | Figure 3 |
1. Putting the sample into the cryostat:
- Fix the sample to the sample holder stick and insert it into the sample chamber.
- Evacuate the sample chamber and fill with He gas. Repeat 2 or 3 times.
- Evacuate the sample chamber.
- Introduce a small amount of He as exchange gas (volume corresponding to a few centimeters of the tube of the rubber balloon).
- Connect the temperature regulation (ILLSEC) and the heating to the corresponding connectors.
2. Cooling down the cryostat
- Evacuate the outer chamber for the insulating vacuum (secondary vacuum: 10-5 to 10-6 mbar)
- Evacuate the He bath and the tail and the sample chamber and refill with He gas. Repeat 2 or 3 times.
- Fill the N2 chamber with liquid N2 until it flows over.
- Let the cryostat cool down.
- Connect the He gas counter to the cryostat at the exit with the red handle valve.
-
He transfer:
- Place the liquid He bottle and the cryostat so that the top of the He bottle and the opening for the liquid He transfer on the cryostat are at the same level.
- Note the number indicated by the He gas counter
- Open the red handle valve connected to the He gas counter
-
Introduce the long end of the transfer tube slowly into the liquid He bottle. When the pressure in the He bottle mounts let pass some He gas through the tube in order to get rid of the air in the tube.
- Insert the transfer tube into the cryostat and start the transfer.
-
Keep the pressure in the liquid He bottle at about 0.1 bar. If the pressure is too high evacuate by another valve on the liquid He bottle, if it is too low use the rubber balloon to mount the pressure.
-
During the transfer heat the tube to the He gas counter with the hot air gun to avoid the freezing of the counter.
- Verify the liquid He level in the cryostat with the membrane device.
- When the cryostat is full take out the transfer tube and close the He bath on the cryostat.
- Note the number indicated by the He gas counter.
- Open the cold valve
- Close the hot valve and open it ~ 2 revolutions
- Wait for the temperature to stabilize at the set temperature
- See annex for suitable positions of the hot and cold valves at different working temperatures
3. Mounting the cryostat on the horizontal diffractometer
- Mount the cryostat on its black support with the Al windows parallel to the long side of the support.
-
Mount the cryostat on the diffractometer (with the RTN160 dismounted) using the specially shortened screws you can find in the red box containing the cryostat equipment.
4. Working with the cryostat
- The regulation of the temperature is done by the ILLSEC regulator (see the ILLSEC Handbook for details).
-
Working above ~ 5 K:
- Open the cold valve (~ 3 revolutions)
- Regulate the He flow by the hot valve (see list for indications of the optimum positions)
-
Working below ~ 5 K:
-
Close the cold valve completely (a pin hole is always open that regulates the He flow to the optimal value for minimum He consumption and lowest temperatures reachable)
- Open the hot valve completely
- Pump the He from the tail via a long rubber tube (to damp the vibrations from the pump)
-
5. Changing the sample in the cold cryostat:
-
Open the 3-way valve so that the pressure of the liquid He bath is connected to the sample chamber and fills it with He gas.
- Take out the sample holder stick.
- Close the sample chamber with the cap.
- Change the sample on the sample holder stick.
- Be sure that the sample holder stick is at room temperature and dry (!!!) before introducing it again.
- Introduce the sample holder stick into the sample chamber.
- Close the 3-way valve.
- Evacuate the sample chamber and put in a small amount of exchange gas (see 1.)
partners


European Synchrotron Radiation Facility - 71, avenue des Martyrs, CS 40220, 38043 Grenoble Cedex 9, France.